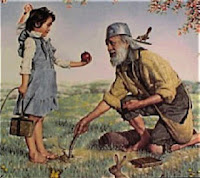
Saturday, March 30, 2013

Honoring Johnny Appleseed Month


(Because I missed the actual day earlier in March!)


John Chapman, better known as Johnny Appleseed, was a pioneer nurseryman during the days of the great American frontier.  He was an eccentric but kind and generous personality, and has become a dearly loved legend, respected for his love of the land and all living things, his leadership in conservation, and his missionary work with The New Church.  But most of all, he is remembered for his apple trees.

Born in 1774 in Massachusetts (around the time of the Battle of Bunker Hill; his father, Nathaniel Chapman, served in the Continental Army under George Washington in the Revolutionary War), John Chapman went west at the age of 18.  As a boy, he was started on his career as an orchardist through an apprenticeship to a Mr. Crawford, who had apple orchards.  There are many tales about the path Johnny's life took, where exactly he lived and traveled, and the popular image is of Johnny scattering apple seeds randomly as he walked.  But in truth, he planted nurseries along his way, leaving them in the care of a neighbor who then sold the trees for him on shares, and returning every few years to tend his trees.  In this way, Johnny introduced apple trees to large parts of Pennsylvania, Ohio, Indiana, and Illinois. 

Though apples grown from seeds aren't typically the sweet, fresh-eating apples we think of today, the small sour apples his trees produced were popular among settlers for baking and making hard cider. 

The only surviving tree, according to the American Forests' Historic Trees program, is located on a farm in Nova, Ohio.  Most agree that the tree is a Rambo variety, introduced to American in the 1640's.  The fruit ripens in September and is a cider or baking/applesauce variety of apple.  Cuttings of the "Johnny Appleseed Tree" are grafted onto rootstock and young saplings are available through nurseries, such as Raintree Nursery. 
(I want one!!!)

Planting a Johnny Appleseed Tree is a wonderful way to keep the spirit of one of America's greatest legends alive, and remember the role agriculture played in the settling of the great American frontier.  Plus, it's an excellent conversation starter, with botanists and historians alike!

Thursday, March 28, 2013

Taking Slips - An Old-Fashioined Approach

Today, I suppose the more commonly used term for slips is "cuttings."  But even though the miracle of growing a whole new plant from a tiny piece of the original is new to some, the practice of taking slips as a method of plant propagation is a very old one.

In Victorian times, taking slips of plants like roses, hydrangea, begonias, and geraniums was a favorite way to share the favorite and most popular varieties with friends and neighbors. And it still ought to be a favorite way of creating more plants to share!

Through the years, plant propagation has become an extensive science. We have specially formulated rooting hormones, rooting media, propagation houses and chambers in which we can control temperature and humidity... the list goes on. But for centuries, plant enthusiasts have been propagating plants using much simpler methods.

Slips or cuttings can be rooted in a few different medias, such as moist sand, soil, or just plain water.  I usually use a mixture of perlite and peat moss, to provide a sterile balance of water retention and drainage.  (But plenty of times have I come home with a bag full of slips and simply stuck them in a jar of water on the windowsill... and been very successful!) 

To begin, select donor plants that are healthy, free of pests and disease, and have been well-watered.  Also, do a little research on the specific type of plant to determine the best time of year to take cuttings (often when the plant is actively growing, in the spring and summer), if they should be softwood, semi-hardwood, or hardwood cuttings, and what type of cuttings to take (stem, leave, root, etc.).  Stem cuttings are the most common, and what I will be demonstrating.

When cutting material from the plants, keep in mind that it's helpful to do a little shaping and pruning while you're at it.  Avoid taking cuttings in the heat of the day, and make sure to keep them moist!  
Individual slips should be between three and six inches long, with at least two nodes (the swollen parts along the stem where leaves are attached) - one at the bottom and at least one at the top.  (The exception in length is if you're taking slips from a plant with very long internodes, or the spaces between two nodes.  In this case, just be sure to include two nodes, and rooting media that is deep enough to support the extra-tall cutting.)  Remove the leaves from the bottom node, and make sure that no leaves will touch the rooting media.  Leave the leaves growing from the top node(s) to photosynthesize and provide energy for the developing roots; if the leaves are very large (like hydrangea leaves) you can trim them back slightly. 
 
 From left to right: Feverfew, Autumn Sage, Hydrangea, Lavender

Before inserting your slips into rooting media (other than water), you may want to dip the bottom node in a rooting hormone.  I use a general powdered hormone, indole-3-butyric acid, that works for most types of cuttings to speed root development. 

Any type of container can be used for starting cuttings, as long as it will provide drainage.  I like to recycle, so I use whatever little nursery pots I have around... Just be sure you clean and disinfect whatever you use to as not to spread disease to your new little plants.


Stick your cuttings into moist rooting media, and mist with water. Again, preventing them from drying out is very important! To raise the humidity around the cuttings, you can make a mini-greenhouse by placing a plastic Ziploc-type bag over the pot and placing it on a windowsill out of direct sunlight. I also put cuttings in a cold frame, which keeps the environment warm, humid, and out of direct sunlight.
After a few weeks of keeping your slips warm and well-watered, test for root development by tugging gently on the tops: if they pull out easily, the roots are still forming; if they resist when tugged, you should have roots! Gently remove one of your slips and check!


Now, your new plants can be planted in the garden, or potted up and shared with friends or neighbors over the garden gate, in true Victorian fashion.

Wednesday, March 27, 2013

Ladybugs!

Because I was absolutely thrilled to see so many ladybugs in the field today (looking quite content living in a few patches of weeds), I got to thinking about what more can be done to help these little guys out. 

Attracting beneficial insects, like ladybugs, is an important principle of organic farming/gardening, as these little guys have incredible appetites for aphids.  This goes hand in hand with companion planting (a topic for another day!), interplanting crops with different types of plants that serve to attract and/or repel certain critters.  For now, this means interplanting with plants that ladybugs find particularly appealing. 


Plants to attract ladybugs:
  • Feverfew
  • Cilantro
  • Butterfly weed (Asclepias)
  • Dill
  • Fennel
  • Cornflower (Centaurea cyanus)
  • Yarrow
  • Queen Anne's Lace (Daucus carota)
  • Tansy (Tanacetum vulgare)
  • Cosmos

Luckily for me (and everyone else who loves flowers) most of these plants also make excellent cut flowers as well!

Tuesday, March 26, 2013

Sweet Peas

 The origin of sweet peas (Lathyrus odorus) in the wild is disputed, but since Victorian times, the climbing annual vines of highly fragrant flowers in shades of pink, purple, white, and blue have been widely popular garden plants. 


Lathyrus odoratus L.
Commelin, Johannes
Horti medici amstelodamensis rariorum tam Orientalis
vol. 2: t. 80 (1701)


The first written record of sweet peas was in 1695 by Francisco Cupani, a monk from Sicily who was the caretaker of the botanical garden in the village of Misilmeri.  In 1699, Cupani sent seeds from his sweet peas to Dr. Casper Commelin of the Amsterdam school of medicine.  In 1701, Commelin published an article on the plant, known then as 'Lathyrus distoplatyphylos, hirsutus, mollis, magno et peramoeno, flare odoro.'  This translates literally from Latin as 'a type of pea with different broad leaves, hairy, soft, large and delightful, with a "blown up" scent.'  A lengthy, but appropriate description!


Historians presume that at the same time, Cupani also sent his sweet pea seeds to Dr. Robert Uvedale in Middlesex, England, based on a herbarium specimen that Dr. Leonard Plukenet made in 1700, sighting the plant’s origin as Dr. Uvedale’s garden.


Through the mid-1800's, only six colors of sweet peas were available in Europe.  But near the turn of the century, hybridizing began by Henry Eckford (1823–1905), a Scottish nurseryman, and the humble sweet pea of Cupani's Sicilian garden was transformed into the romantic Victorian garden sensation we so adore.  Eckford's varieties of sweet peas are those known today as heirloom and old-fashioned sweet peas.


Monday, March 25, 2013

What are heirloom flowers? And why grow them?

You've heard the word.  Maybe from your grandmother.  Maybe at a farmers' market or on seed packets.  So what exactly is an heirloom variety?


The word "heirloom" may conjure up many different images in your mind: a locket or trinket that belonged to your great-grandmother; the now-tattered quilt that was lovingly stitched a century-and-a-half ago; the China dishes that are brought to the table at Christmastime.  But when used in reference to garden plants, what does it mean?

In fact, that heirloom rose bush in your grandmother's yard may not be very different, by definition, from the locket that belonged to her grandmother, in the sense that it, like all heirlooms, has been in the family for generations; perhaps that rose bush was grown from a slip (more commonly called a "cutting" today) taken from a bush that once grew on the old family homestead; perhaps it was brought across the sea from a bush that grew in the Old Country.  Whatever may be this rose's story, you know that the bush is a precious family heirloom, and delight in its stunning blooms and heady fragrance summer after summer.

Lovers of history, such as myself, may want a more concrete definition of the term "heirloom."  Heirloom varieties are those that were grown at an earlier period in history - some records have varieties dating back to the 1200's!! - and not grown at the large-scale level of modern commercial agriculture.  Some believe an heirloom variety must be at least 100 years old, others 50 years.  Historically speaking, a heirloom variety can be one that was in existence prior to either 1945, according to some, since this coincides with the end of World War II, or 1951.  After World War II, and especially after 1951, commercial agriculture began to move at a faster pace, demanding more and more modern hybrids to keep up with the increasing demands of production.  Food moved from the kitchen garden or family farm to the grocery store; and flowers left gardens for florists. 
In perhaps the strictest sense, by the laws of botany, an heirloom variety of a plant is one that is produced by open pollination; that is to say, the seed from which it came developed naturally, having been pollinated by another genetically similar plant with the help of natural mechanisms such as insects, birds, and wind.  The seed resulting from these plants can be collected and will grow true to form the following year, passing on the parent plants' characteristics to the following generation.  In most cases, heirloom varieties of flowers have brighter colors and stronger fragrance.  They also tend to be better suited for their surrounding environment and ecosystem, as they have been allowed to adapt over time to the area's specific conditions.  Because the pollen source, or male parent, is unknown in open pollination, it does allow for the possibility of naturally occurring hybrids or offspring that vary widely in genetic traits, which increases the gene pool and biodiversity (which, from an ecological standpoint, is always a good thing!).
In the case of heirloom varieties of plants like fruit trees and rose bushes, traits of the heirloom are perpetuated and preserved through techniques such as grafting and cutting.  In fact, you can still purchase one of Johnny Appleseed's very own saplings, from Rain Tree Nursery!  (Visit  http://www.raintreenursery.com/Johnny_Appleseed_Apple_Antonovka.html  to read about how his heirloom apple trees have been preserved since the 1830's.)
Hybrid plants, those that are most widely grown commercially, come from seed that has been specially selected by cross-pollinating two genetically different plants, with the intention of breeding for desired traits.  The results are plants with a purpose: tomatoes that can withstand long-distance shipping, for example.  However, when seed is collected and grown from hybrids, the offspring will not grow true to form.  For example, when plants A and B are crossed to form hybrid C, seed from hybrid C will not produce plants with hybrid C's qualities, but will exhibit traits like those of either parent A or parent B.  That is, if seed from hybrid C is not sterile, as is often the case with hybrids.   

On a commercial agriculture level, hybrid plants are necessary; they often are bred for higher yielding crops, and much of the world survives because of modern hybrids, so of course they have their benefits.  But so do heirlooms.  And preserving heirloom flowers, as well as fruits and vegetables, means the preservation of genetic material that once lost is lost forever. 
There is also a personal side to growing heirlooms.  They connect us in a tangible way to the past; they connect us to our ancestors in the Old Country, to our Founding Fathers, to pilgrims and pioneers.  Many heirlooms were the very same varieties that our very own ancestors have cultivated for generations, each year saving seed so that the brilliant colors, lovely scents, and soul-lifting beauty of their flowers might be preserved.   As you admire heirloom flowers, allow the nostalgia and romance of the past draw you closer to your ancestors and help you to form an understanding and appreciation for their way of life.

Historic Farms & Gardens

I adore history: historic farms, gardens, and homesteads especially!

Over the past several years, I have been privileged enough to have the opportunity to visit many historic farms and gardens across the country, from Spanish missions, fur trading forts, and Gold Rush era towns in the West, to Colonial and Civil War era farms and plantations in the East. And everywhere I am met with the realization that not only did our ancestors grow crops and plant kitchen gardens out of necessity, but they also grew a stunning array of flowering plants for the sake of beauty alone - and because blooming flowers put smiles on faces and lift our spirits!

Here, I will share with you some of my favorite historic farms and gardens I have visited.

Planting Season

Planting has begun at The Old Flower Patch!


With lots of help from the excellent folks at McKinley Family Farm - Kristine McKinley, Jennifer Lacy, Frank Moglia, and Nancy Wilkerson - and the man who supports me as I chase my dreams, Eric Nystrom, my flower patch is ready for planting! 


With manure spread, ground tilled, rows marked, and irrigation lines in place, my first season as a flower farmer is off to a fine start.


This past winter, I started a variety of plants (mostly perennials) from seed under grow-lights and plastic in a protected part of the back porch.


With the beginning of spring, the seedlings are ready to be transplanted and seeds
can now be direct-sown into the field.


Monday, March 18, 2013

Welcome!


Welcome to The Old Flower Patch, a small flower farming operation in its infancy! 


I am very excited to begin growing cut flowers at McKinley Family Farm!  I have been a backyard organic gardener since I was a little kid helping my dad plant the summer garden each year, and am thrilled to have the opportunity to try my hand at growing and selling cut flowers this coming season.  I'm looking forward to sharing my experiences as I sow seed, pull weeds, fend off pests, and hopefully harvest beautiful blooms!

Spring has arrived, the soil has been tilled... It's time to plant!